Bat cave wall graphics by Iconography Studios. Smash! Bam! Pow! These custom designed graphic wall wraps for a child’s bedroom in a Los Angeles home really make an impact!
Custom graphic wall coverings are the latest trend in interior design from the bedroom to the boardroom. Residential and commercial applications of these custom wall wraps have been keeping our design and installation teams busy. With the technology and tools available today, there really is no limit to what can be created for your walls, windows, floors and even furniture. Our art department can incorporate high resolution photographs and other graphic imagery, logos, text and even personal artwork into these custom wall papers.
While the standard materials adheres best to walls that have a smooth finish and are painted with a gloss or semi-gloss paint, there are speciality materials that can be used on rougher surfaces like stucco and brick.
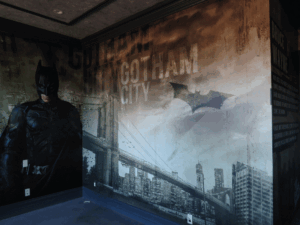
How To Create Realistic Bat Cave Wall Graphics
Creating a realistic Bat Cave wall wrap involves layering texture and depth to mimic natural rock. You can achieve this through 3D structural methods, or through high-quality 2D visual wraps, which is what we did here.
Once a design has been finalized either by our art department or yours, we print out the graphics on one of our giant in-house digital printers on the appropriate material for your particular application. All of our wall graphics are finished with a laminate film for durability, longevity and ease of cleaning. Our 3M certified graphics installers operate on a nationwide basis and can complete most single-room installations in one day.
Bat Cave Wall Graphics Installation
Installing custom wall wraps—large-scale vinyl graphics or murals—requires careful preparation and precise execution to ensure they stick and look professional. Our 4 step process guarantees a flawless installation:
- Wall Preparation
- Cleaning: The surface must be thoroughly cleaned with a damp cloth or a mixture of water and a mild solvent to remove dirt, grease, and dust.
- Drying & Testing: Allow the wall to dry completely (often for at least an hour) before starting. Professionals may perform an adhesion test to ensure the vinyl will stick to the specific paint type.
- Smooth Surface: Any obstacles like light switch plates, electrical outlets, or knobs should be removed before installation to create a smooth,
- Alignment and Positioning
- Layout: For large murals, the wrap is typically printed in multiple panels. These must be numbered and laid out to ensure they line up correctly.
- The Hinge Method: Installers often use masking tape to create a horizontal “hinge” at the top of a panel. This holds the graphic in place while they peel back the top portion of the liner.
- Leveling: A level or measuring tape is used to ensure the design is perfectly straight, as you cannot rely on wall edges or paper backings for accuracy.
- Application Process
- Squeegeeing: Using a felt-covered squeegee, the installer applies even pressure, moving from the center of the graphic outward toward the edges to push out air bubbles.
- Managing Overlaps: Panels are often designed with a slight overlap (e.g., 50mm to 150mm) to ensure the pattern aligns seamlessly across seams.
- Heat Application: A heat gun is used to make the vinyl more malleable around corners, curves, or textured surfaces. Post-heating at 200–250°F helps fully activate the adhesive for a permanent bond.
- Finishing Touches
- Trimming: Excess vinyl at the ceiling, floor, or around outlet cutouts is trimmed using a sharp precision blade (like an X-Acto knife).
- Final Sealing: Installers go over the edges and seams one last time with a squeegee to prevent lifting
Always dreamed of having your own bat cave? Well, now you can! Give the experts at Iconography Studios a call at 562-424-4353 to get started on turning your favorite room into your personal bat cave or other custom lair.