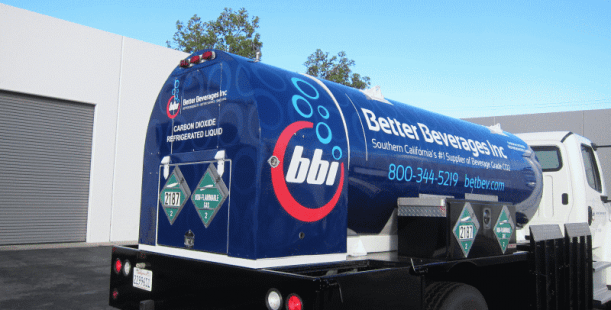
Tanker truck wrap for our client Better Beverages. They know that vehicle wrap advertising is one of the most cost effective forms of outdoor advertising, offering the lowest cost-per-impression of any method of outdoor advertising. For this reason, Better Beverages has wrapped the fleet of vehicles from box trucks to tankers like this one.
A tanker truck may look difficult to wrap because of its cylindrical shape, but when you work with the vehicle wrap experts at Iconography Studios, you’ll see that we can easily wrap even the most complicated objects. These custom tankers deliver CO2 to their customers, so while these tankers may be full of gas and bubbles, our wraps are not. Our certified installation team are all expertly trained on the methods necessary for making sure that the adhesive-backed vinyl of the wrap material properly adheres to the curvy surfaces of these tanker trucks.
Using the correct materials and laminates is an important part of making sure your installation on a curvy object goes well. At Iconography. we prefer to use the highest quality vehicle grade wrap materials from 3M for both the vinyl and the overlaminate.
What are tips for tanker truck wrapping?
To vinyl wrap a cylinder, you will need to apply the vinyl slowly from the center outward, using a squeegee to smooth it onto the surface as you go. This technique, sometimes called the “hinge method,” helps prevent wrinkles and air bubbles. You will also use a heat gun to make the vinyl more pliable and conformable for a seamless finish.
Tools and materials needed to successfully instal a vinyl wrap:
- Vinyl wrap material: cut slightly larger than the surface you need to cover.
- Heat gun or hairdryer: To make the vinyl more flexible.
- Squeegee: For smoothing the vinyl and removing air bubbles.
- Utility knife or craft knife: For trimming excess vinyl.
- Rubbing alcohol: To clean the surface.
- Microfiber cloth: For cleaning and preparing the surface.
- Masking tape: To hold the vinyl in place and create a hinge.
Vinyl Wrap Installation Instructions in 9 Steps
- Prepare the cylinder. Thoroughly clean the entire surface of the cylinder with rubbing alcohol to remove any dust, dirt, or grease. Any imperfections will show through the vinyl, so ensure the surface is completely smooth and dry before you begin.
- Size the vinyl. Unroll the vinyl and lay it flat. Cut a rectangular piece that is long enough to fully wrap around the cylinder with about an inch of overlap. Also, leave a few inches of extra material on the top and bottom to make trimming easier later.
- Create the hinge. Lay the cylinder down in the center of the vinyl wrap. Apply a strip of masking tape down the center of the vinyl across its width to act as a hinge.
- Remove backing and apply the first side. Fold back one half of the vinyl and peel the backing paper off up to the tape hinge. Gently apply the exposed, sticky vinyl to the cylinder, working from the center tape hinge outwards toward the edge.
- Squeegee the vinyl. Using your squeegee, smooth the vinyl onto the surface. Use firm, overlapping strokes to push out air bubbles and ensure strong adhesion. If you encounter any small bubbles, you can prick them with a sharp knife or needle to release the trapped air.
- Apply the second side. Remove the masking tape hinge. Gently peel the remaining backing off and repeat the process, applying the second half of the vinyl from the center outwards. Take your time to ensure the edges meet cleanly with minimal overlap.
- Remove excess vinyl. Use your utility knife to carefully trim the excess vinyl from the top and bottom edges. A sharp blade is crucial for a clean cut. For the overlap seam, you can use a fine, sharp blade to trim it for a nearly invisible line.
- Heat and set the wrap. Go over the entire surface with your heat gun on a low setting. The heat will activate the vinyl’s adhesive and help it conform perfectly to the cylindrical shape. Use the heat on any bubbles or wrinkles that remain and smooth them out with your squeegee.
- Finish the ends. For the top and bottom ends, if they need covering, you can use a separate, circular piece of vinyl. Apply it slowly from the center outwards, using heat to help it curve over the edge smoothly.
Are you interested in updating your fleet graphics? Or perhaps your marketing department is looking to expand their avenues for advertising and branding? Why not take advantage of an asset you already have in your fleet? Give us a call today at 714-5274-5424 – we’d be happy to walk you through the details of our fleet graphics management program.